
How to Read a Tulip Map/Diagram

How to Read a Tulip Map/Diagram
![]() tpb4x4 Sun Apr 12, 2009 4:56 pm
tpb4x4 Sun Apr 12, 2009 4:56 pm
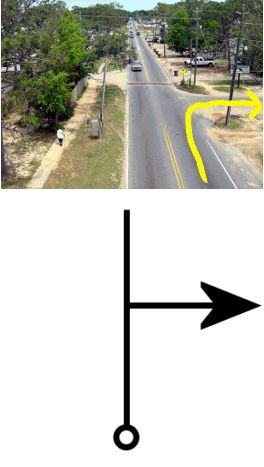
A tulip diagram is a pictorial representation of a navigation instruction in a rally roadbook depicting an intersection or a segment of road usually made up of a ball and arrow schematic. It may also include objects in sight of the road that can serve as navigational references. The ball at the base of the tulip denotes the point one will enter the intersection or road segment and the arrowhead shows the direction out of the intersection or away from the road segment. Tulip diagrams only approximate the configuration of roads and intersections as they appear upon approach, only including enough details to enable identification of the location. (Aerial Photo of a Right Turn Sample Tulip Diagram shown below)
Tulip diagrams are named after the Tulip Rally (Tulpen rally) in Holland where the format was first used in the 1950's.
The aerial photograph to above shows an intersection with a main road and a side street to the right which we wish to direct riders to take, as shown by the yellow arrow. Below the aerial photograph is the tulip diagram used to represent this turn instruction. The large ball or dot at the bottom of the diagram shows the point where one approaches the junction from, and the arrowhead shows the direction one is to take to exit the road segment or intersection.
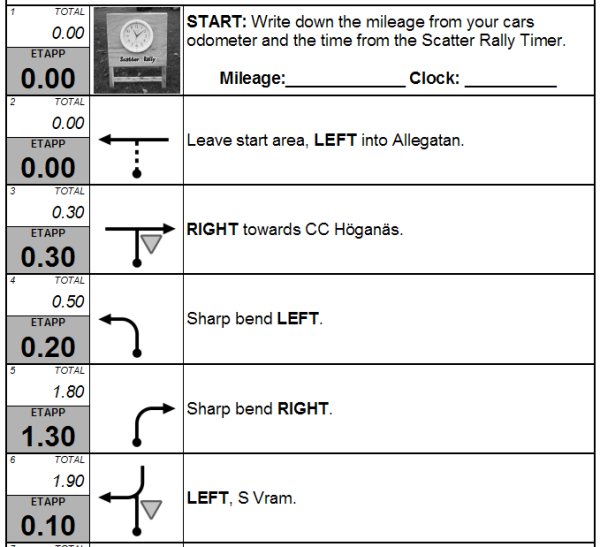
Also, below is a map that shows a route along with a 'Tulip Roadbook' that goes with it. I have also included an explanation from a road rally using the examples below:

Tulip diagrams are named after the Tulip Rally (Tulpen rally) in Holland where the format was first used in the 1950's.
The aerial photograph to above shows an intersection with a main road and a side street to the right which we wish to direct riders to take, as shown by the yellow arrow. Below the aerial photograph is the tulip diagram used to represent this turn instruction. The large ball or dot at the bottom of the diagram shows the point where one approaches the junction from, and the arrowhead shows the direction one is to take to exit the road segment or intersection.
Also, below is a map that shows a route along with a 'Tulip Roadbook' that goes with it. I have also included an explanation from a road rally using the examples below:
- 1: At the starting point you must write down the mileage from your car and the time from the Scatter Rally Clock. This is important as it is used for scoring and you will need this information to ensure you are arriving and leaving the control points at the correct time.
2: Leave the start area and turn LEFT. Note the mileage on the left of the sheet has been 0.00, this will now change.
3: Drive 0.3 km (300m), at the T-intersection, with Yield sign, turn RIGHT. There is a sign pointing to CC Hoganas.
4: Drive 0.2 km (200m), follow sharp bend to LEFT. Note: the total mileage is now 0.5 km (500m).
5: Drive 1.3 km, follow sharp bend to RIGHT.
6: Drive 0.1 km (100m), turn LEFT towards S.Vram.

tpb4x4- Admin
- Posts : 9
Join date : 2009-04-10
Age : 49
Location : Made in Wales, Live in Camberley
Vehicle : Mitsubishi Pajero XRII
Real Name : Tim -

Permissions in this forum:
You cannot reply to topics in this forum|
|
|